Informatica
PowerCenter 9.x. This includes the installation of server components and
Repository configuration.
Before
you start Informatica PowerCenter Server Tool Installation, you should create 2
database schemas for Domain and Repository.
Here
I used Oracle 10g as database.
Syntax:
Grant
connect, resource, create view, select_catalog_role, select any dictionary to infa_domain identified
by infa_domain; --for domain usage
Grant
connect, resource, create view to infa_repo identified by
infa_repo; -- for repository usage
Install Informatica
PowerCenter Server:
1)
Open Windows Explore and navigate to the
X:\Infa_9.1_32bit\dac_win_11g_infa_win_32bit_910\910HF2_Server_Installer_win32-x86\Server
folder.
2)
Double click on "install.exe" to begin the installation
wizard.
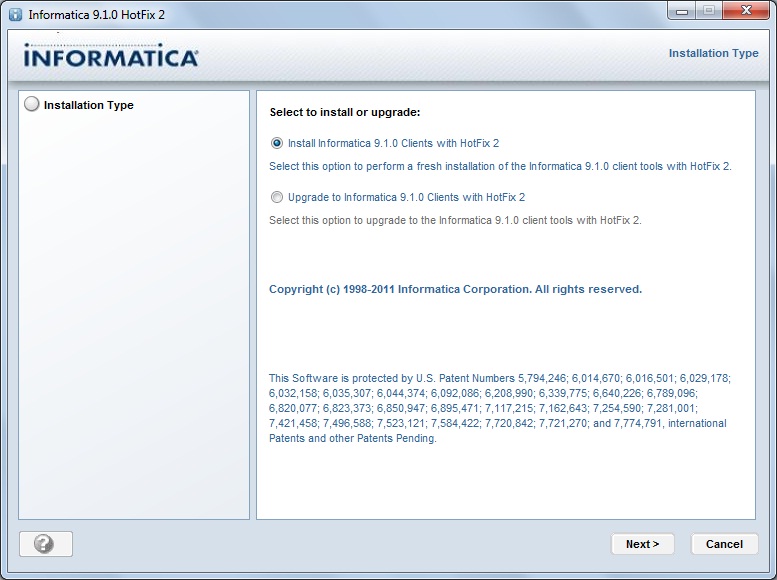
Make
sure you have selected Installation Type as 'Install Informatica 9.1.0
with HotFix 2'.
3)
Click Next.
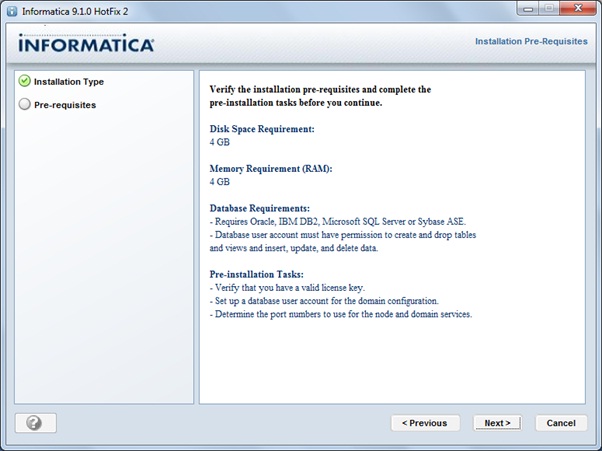
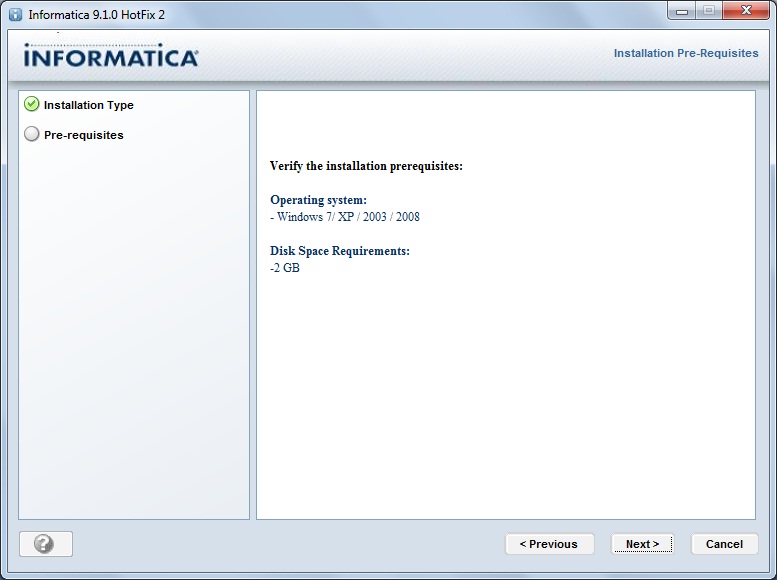
4)
Verify the Pre-requisites and click Next
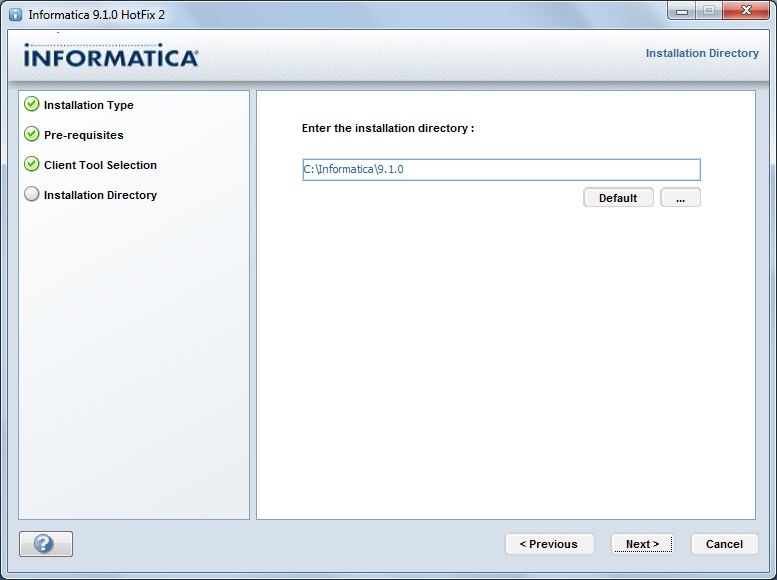
5)
Select the License and Installation Directory.
License:
Browse the License Key path
<X:\Infa_9.1_32bit\dac_win_11g_infa_win_32bit_910\910HF2_Server_Installer_win32-x86>
for License Key 'Oracle_All_OS_Prod.key'.
Directory:
Use default directory only.
6)
Click Next

7)
Check Pre-Installation Summary and Click Install.
8)
The Installation begins. (It will take few minutes).
9)
Select 'Create a domain' to create an Informatica domain.
Note:
Select 'Join a domain' if you want to use existing domain.
Select 'Enable
HTTPS for Informatica Administrator' this is an options.
Click Next
10)
Configure the database for the domain configuration repository:
Database type: Choose your
database type for domain configuration (Oracle/SQL Server/Sybase)
Database user Id: <Domain_database_username>
User password: <Domain_database_password>
Database
Connection: Select JDBC URL
Database Address: hostname:portnumber
(default oracle port number is 1521)
Database service name: <SID/ServiceName>
(default orcl).
then
click on 'Test Connection' (To check the database
connection).
 Note:
Please your domain username and password which we have created at the
beginning.
Note:
Please your domain username and password which we have created at the
beginning.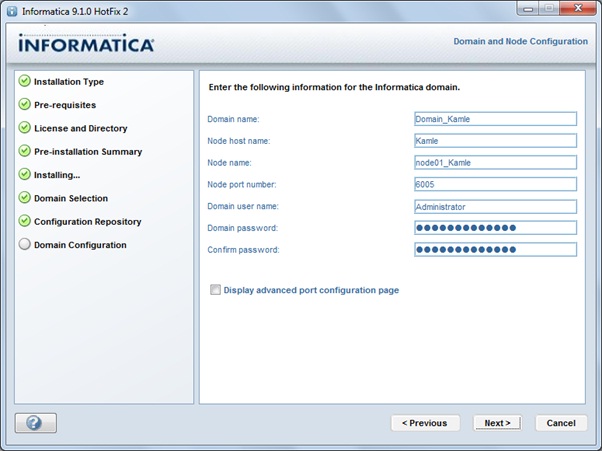
11)
Informatica domain configuration:
Domain Name: Name
of Your Domain
Node host name: Machine/Server
name on which your Integration Service is Running
Node name: Name
of the Node
Node port number: Leave
the default port number
Domain user name: The
user Administrator
Domain password: Administrator
Password.
Confirm password: Confirm
Administrator Password
Note:
1.
User default Domain name, Node host name and Node port number.
2.
The Administrator user id and password is used to logon to Administrator
Console, to create 'Repository'.
Click Next.
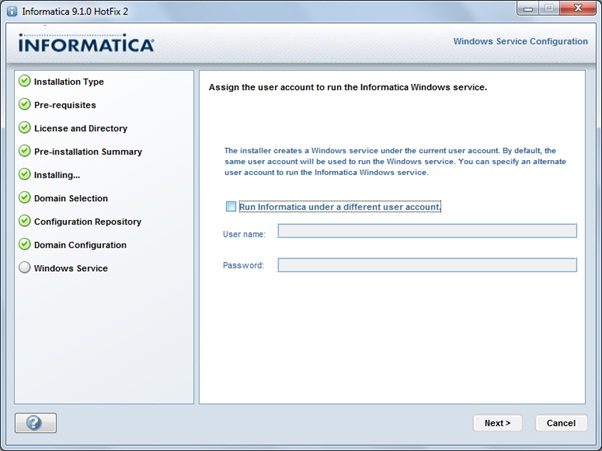 12)
Click 'Next'. Do not select 'Run Informatica under a different user account'.
12)
Click 'Next'. Do not select 'Run Informatica under a different user account'.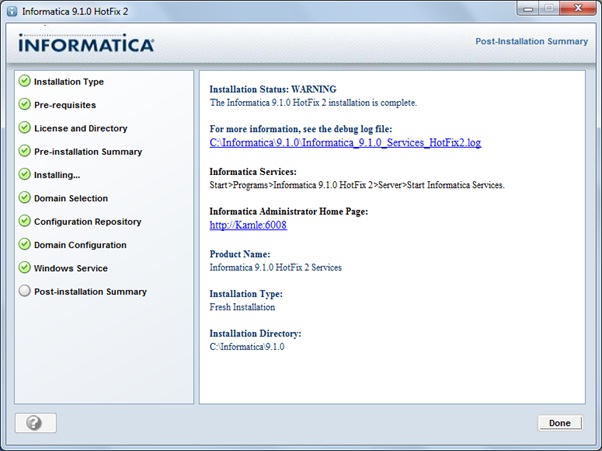
13)
Installation is completed.
Now you have to create repository into your domain
using Administrator.
Configure
Repository Service:
To logon into Administrator Console.
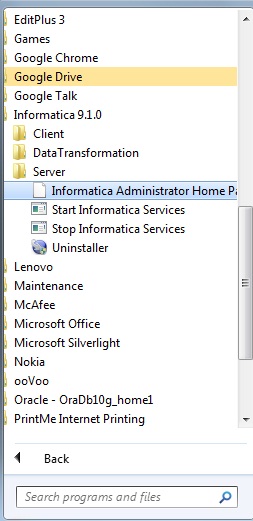
1)
Go to Start Menu --> Informatica 9.1.0 --> Server --> Click on ' Informatica
Administrator Home Page'
 2)
Log on to ' Administrator Console'
using Administrator User Id and Password (which you set at step 11 in
Install Informatica PowerCenter Server) and Click on Log In
2)
Log on to ' Administrator Console'
using Administrator User Id and Password (which you set at step 11 in
Install Informatica PowerCenter Server) and Click on Log In 3)
You will see Informatica Administrator screen as below:
3)
You will see Informatica Administrator screen as below: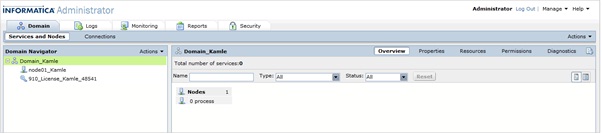
4)
To Create PowerCenter Repository Service:
·
Select Domain name in 'Domain Navigator'
·
Select 'Actions'
·
Select 'New' and
·
Select 'PowerCenter Repository Service'
5)
Provide the details required:
Name: Repository
Name you want to create
Description: Description
about your repository (its optional)
Location: Select
the Domain_Name which you have created. If you have more than one Domain you
need to browse it and select.
License: Select
the License Key from the drop down list.
Node: Select
the Node from the drop down list.
Click
'Next'
6)
Provide repository database details:
Database Type: Select
your repository database type (Oracle/SQL Server/Sybase).
Username: <Repository
Database Username>
Password: <Repository
Database password>
Connection String: <Database
Connection String>
Code Page: Repository
code page
Tablespace Name: <Database
Table Space Name> (its optional).
Select 'No context exists under
specified connection string. Create new content'.
Click
'Finish'.
7)
It will take few minutes to create PowerCenter Repository Service content. Once
it’s down you will be getting below screen.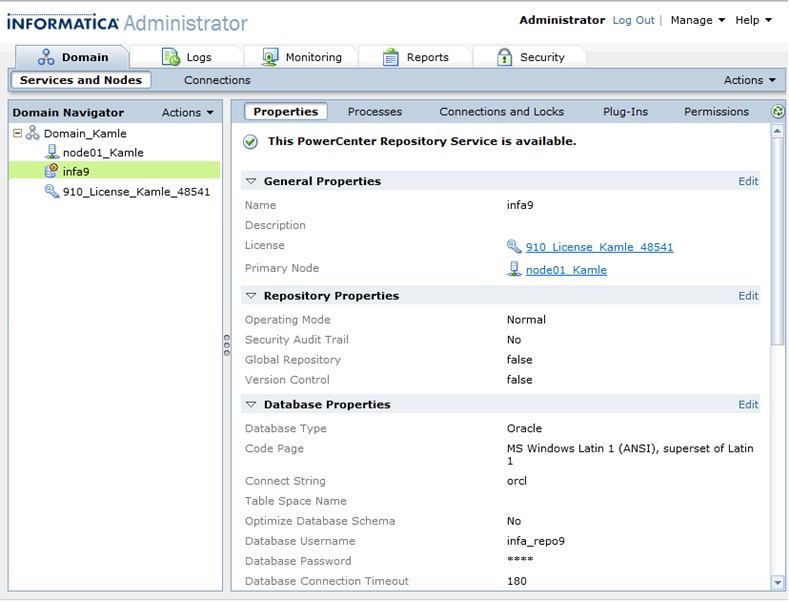
Note:
If you PowerCenter Repository Service is running in 'Exclusive' mode then you
need to change it to 'Normal' Mode before you configure the PowerCenter
Integration Service.
a)
Go to Properties tab of PowerCenter Repository Service --> Repository
Properties --> Edit.
b)
Change Operating Mode: Normal and Click 'OK'
c)
A new pop-up window will appear, Click 'OK'
d)
Recycle Service window will appear, Select 'Abort - stop all processes
immediately' and Click 'OK'
e)
It will take some time and now you PowerCenter Repository Service is running in
'Normal' Mode.
We
are not done, to run you jobs we need to create PowerCenter Integration
Service.
Configure Integration
Service:
1)
To Create PowerCenter Integration Service:
·
Select Domain name in 'Domain Navigator'
·
Select 'Actions'
·
Select 'New' and
·
Select 'PowerCenter Integration Service'
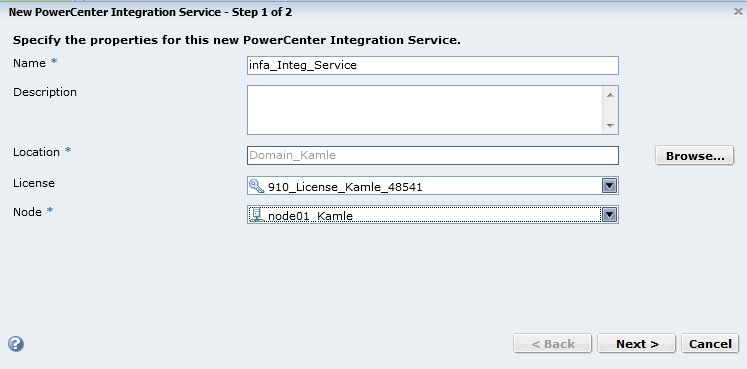
2)
Provide PowerCenter Integration Service details:
Name: Name
your Integration Service
Description: Description
about your Integration (Optional)
Select the Domain_Name which you have
created. If you have more than one Domain you need to browse it and select.
License: Select
the License Key from the drop down list.
Node: Select
the Node from the drop down list.
Click
'Next'
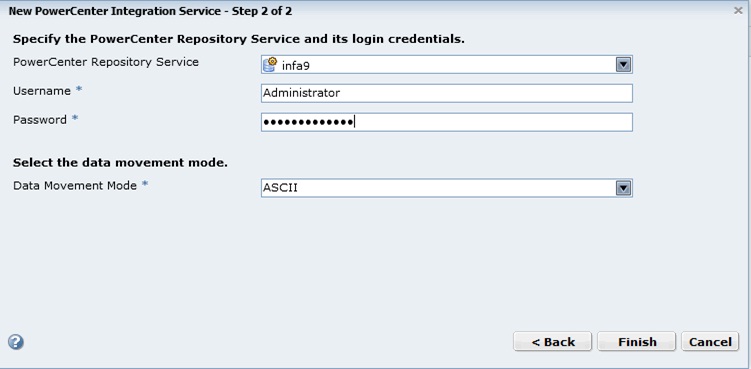
3)
Provide 'PowerCenter Repository Service' and its login credentials.
PowerCenter Repository
Service: Select your repository name from the drop down list.
Username: Administrator
Password: Administrator
Password
Data Movement
Mode: ASCII
Click
'Finish'
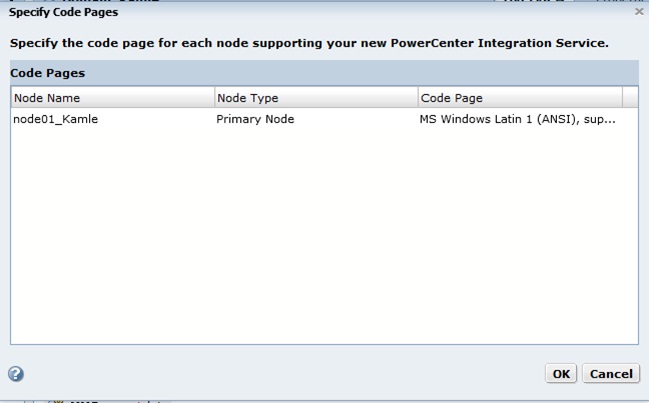
 4)
Specify Code Pages and Click 'OK'
4)
Specify Code Pages and Click 'OK'
Note:
If you PowerCenter Integration Service is 'disabled', Click on 'Enable the
Service' as show in below snapshot.
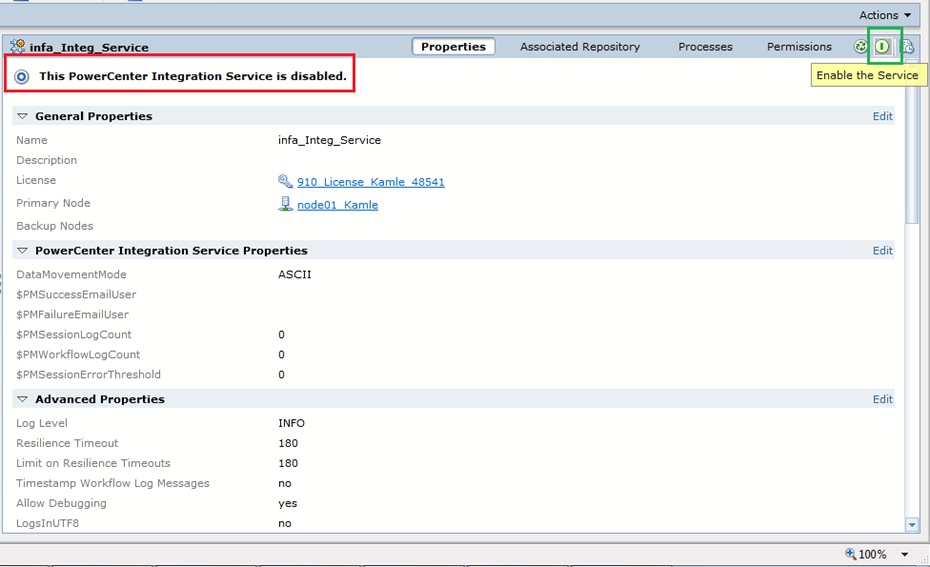
Now
your Integration Service is available.
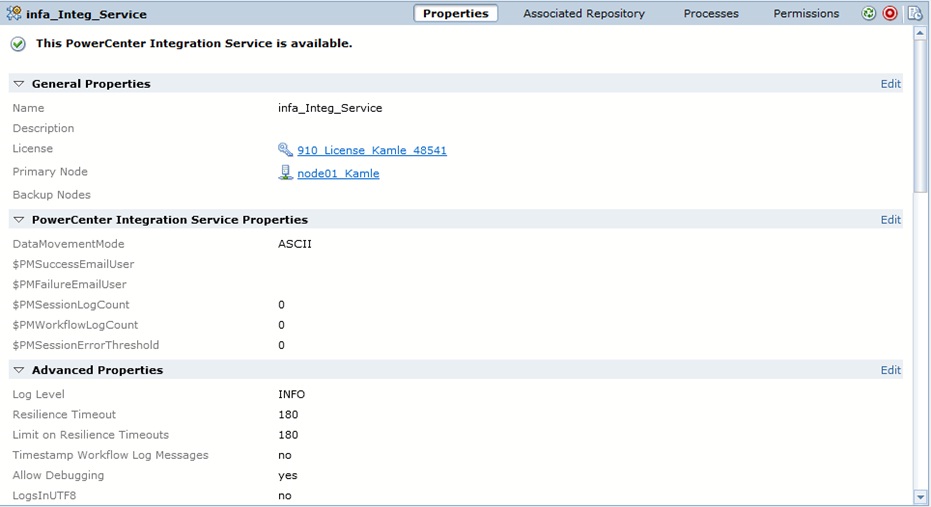
You have successfully
Installed Informatica PowerCenter 9.
Now you can go the
Informatica Repository Manager and create your own folder and start practice.